


Stable version : 4.0.11120600
Latest version : 4.0.11120600
Supported browser versions
Firefox 2.0 - 10.*

Tutorial - Exporting, Importing
Exporting marker information[Export] 
Marker information is exportable as a file. The exported marker information file can be used for a backup file or for information sharing.
To export marker information, right-click a folder you would like to export and select "Export..." from the context menu. You can indicate the export destination folder in the subsequent dialog box.

Importing the exported marker information
By importing exported marker information, users can restore the folders and marker information or utilize the marker information constructed by other people with own marker information.
To import marker information, just drag & drop the exported marker information file into the folder on your Wired-Marker sidebar where you would like to import the marker information.
Read in a file then put a marker[Block registration]
You can put marker on the file that has been read-in. It is possible to read-in multiple files at the same time. There are two ways to read-in files.
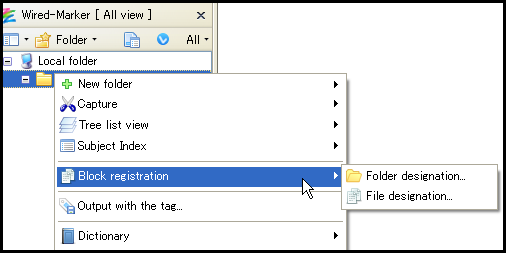
Read-in files by specifying folders
1) Right-click on the folder you want to register the file to by selecting "Block registration" - "Folder designation" from context menu.
2) In the dialog for specifying a folder, select a folder that includes HTML file and / or text file.
3) File will be registered on the right-clicked folder.
Read-in files by specifying files
1) Right-click on the folder you want to register the file to by selecting "Block registration" - "File designation" from context menu.
2) In the dialog for specifying a file, select HTML file and / or text file you want to read-in. Multiple files can be selected when holding down the CTRL key.
3) File will be registered on the right-clicked folder.
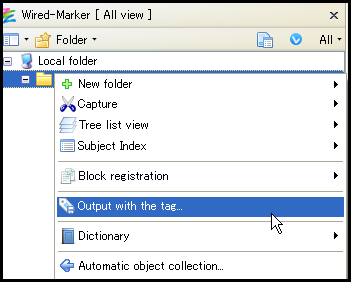
Make a tag then read out the marker [Output with the tag]
Set up user's own tag to the marked place. Then, surround the marked place with tag and out put as a file.
How to out put
1) Right-click the folder where marker object that you want to read out is saved, then select "Properties" from the context menu.
2) "Brief overview" –"tag" to enter the name of the tag you want to attach to marker and out put, then click the "OK" button.
3) Right-click the above folder, then select "Output with the tag" from the context menu.
4) For out put with tag dialog, set up the out put format then click "OK" button.
5) At the dialog, specify the destination to save the folder.
Set up of output form
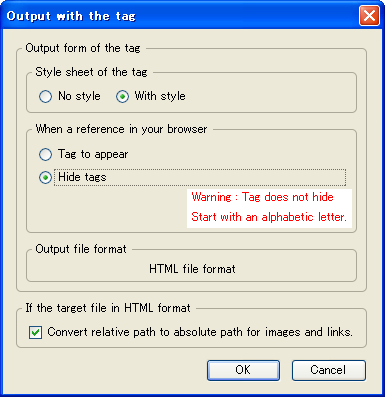
| Menu | Description | |
|---|---|---|
| Style sheet of the tag | No style | Background color or font on marker does not out put on file. |
| With style | Back ground color or font on marker does out put on file. | |
| When a reference in your browser | Tag to appear | Can see the tag on browser. |
| Hide tags | Can not see the tag on browser, can only confirm on file source. | |
| If the target file in HTML format | Convert relative path to absolute path for images and links. | Based on the URL of the marked paged, it will convert. |