


Stable version : 4.0.11120600
Latest version : 4.0.11120600
Supported browser versions
Firefox 2.0 - 10.*

Tutorial - Other Functions
Auto caching 
The cache of a web page will be saved as soon as you put a marker on the web page if auto-caching function is enabled.
With the auto-caching function, it prevents from losing the web page and marker information even when the marked original web page disappears.
How to refer the cache
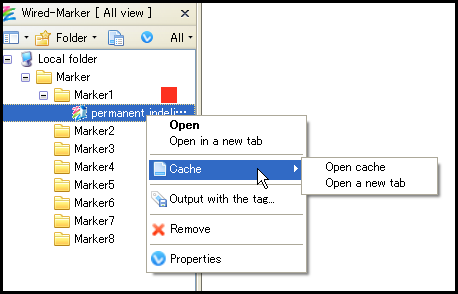
Referring the cache by using right-click context menu on the marker object
1) Right-click on the marker object you would like to refer the cache.
2) Select "Cache" from the context menu, and select "Open cache" or "Open in a new tab".
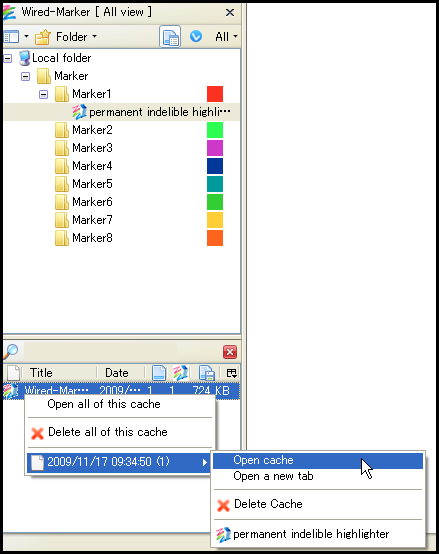
Referring the cache by using cache view
1) Click  button on the sidebar.
2) Cache view will be displayed and the list of cached web pages will be displayed.
3) In the list, right-click on the cached web page you would like to refer to.
4) The list of date on which the cache was obtained is displayed in the context menu. Select the date of the cache.
5) To go back to the marked position in the page, select the title of marker in the displayed list. To refer the cached page itself, select "Open cache" or "Open a new tab".
Advanced settings
With Auto-caching function item on the setting screen, you can enable or disable the auto-caching function, and change where to save the cache files.
Precautions
Since it takes time to cache large size of the web page, the operation of Firefox will be slow while caching.
How to delete all cached file
1) Enable the auto-caching function at Auto-caching function item on the setting screen.
2) Display the cache view by clicking button on the sidebar.
3) Select all caches by "Ctrl key + A" on the cache view.
4) Select "Delete all of this cache" from the context menu, and click "Yes".
Replace URL
Marker information will be lost when the URL of the marked web page changes, or when the location of saved documents change after saving. For these occasions, replacing to the correct URL can restore the marker information.
How to replace
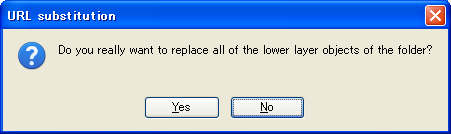
1) Right-click on the folder where marker objects you want to replace the location to save the URL or file exists.
2) Click "Yes" if a child folder exists on the right-clicked folder and marker objects of the child folder is also the object of replacement.
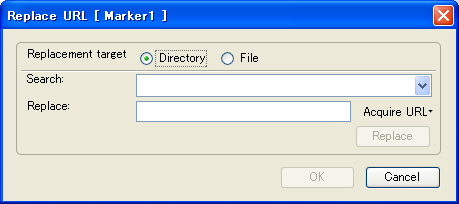
3) Set up the searching character string and the character string after the replacement.
Searching character string can be set up by selecting from the list using dialog, or by direct input.
For character string after the replacement, also set up automatically using dialog or by direct input.
Refer down below about using dialog.
When the set up for searching string character and the string character after replacement is completed, click "Replace".
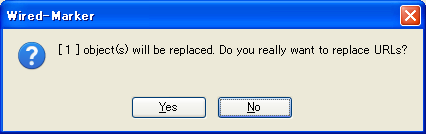
4) Select "Yes" if continuing the process of replacing.
5) Replacement will be executed if clicking "OK" button.
Operating dialog
| Item | Description | |
|---|---|---|
| Replacement target | Directory | Set up the display of the list from "Search" pull down button as follows. Directory of a marked web page and directory of a marked file will be displayed as a list. |
| File | Set up the display of the list from "Search" pull down button as follows. Directory and the file name of a marked web page, and directory and the file name of a marked file will be displayed as a list. | |
| Search | Type in the searching character string. From the displayed list when clicking the pull down button, you can select the searching character string. Displayed list will switch over depending on the selected "Replacement target". | |
| Replace | Enter the replaced character string. Click "Acquire URL" and you can set up the replaced character string automatically. | |
| Acquire URL | Acquire current page URL | Set up the URL displayed at the moment as replaced character string. |
| Acquire URL from a folder | A dialog that refers to the folder will be displayed, so use the dialog to specify and set up the directory of the folder as the replaced character string. | |